
Quick Install in SEVEN easy steps
Also available as video - and textual point by point below:
1. Grab an installable T2 ISO image from one of the binary mirrors and burn the ISO images 1:1 to the optical media.
2. Place the first disk into the drive tray and perform the actions needed on your platform to boot from CD (BIOS setting on x86*, pressing the 'c' key on Apple Macintosh, 'boot cdrom' or variants on OpenFirmware systems, ...). A platform specific message will greet you and usually just hitting enter to boot the first boot entry of the media will load the linux kernel and the installer file-system into the RAM.
3. The first stage loader needs to load the real (and bigger) installer from the media or network. Thus it tries to find optical media first and usually no interaction is necessary. An example probing is shown below:
Mounting /dev, /proc and /sys ...
Running hotplug++ hardware detection ...
Loading additional subsystem and filesystem driver ...
Populating /dev (udev) ...
T2 SDE installer (1st stage - loader) ...
The T2 install system boots up in two stages. You are now in the first stage and if everything goes right, you will not spend much time here. Just configure the installation source so the second stage boot system can be loaded and you can start the installation
0. Load second stage system from local device
1. Load second stage system from network
2. Configure network interfaces
3. Load kernel modules from this disk
4. Load kernel modules from another disk
5. Activate already formatted swap device
6. Run shell (for experts!)
What do you want to do [0-8] (default=0)?
Select a device for loading the second stage system from:
1. /dev/hdc SCSI or ATAPI CD-ROM
Enter number or device file name (default=1):
Select a second stage image file:
1. 2nd_stage
2. 2nd_stage_small
Enter number or image file name (default=1):
Using /dev/hdc: snd_stage
Extracting second stage filesystem ...
Starting udevd ...
T2 SDE installer (2nd stage) ...
This is a small Linux distribution, loaded into your computer's memory. It has everything needed to install T2 Linux, restore an old installation or perform some administrative tasks.
If you use a serial terminal, enter the names of terminal devices to use, for example '/dev/ttyS0' for the first serial port or just '/dev/console', just hit enter otherwise. (default=vc/1 vc/2 vc/3 vc/4 vc/5 vc/6):
Unless you run on a serial terminal line (e.g. on a network installation of an head-less server) you just press enter here to get access to the usual virtual console devices and you will get the final shell prompt:
4. Now you already have a fully functional Linux system to your fingertips, running from the systems RAM which can be used for rescue maintenance tasks. For the installation you just need to run the setup tool Stone, now:
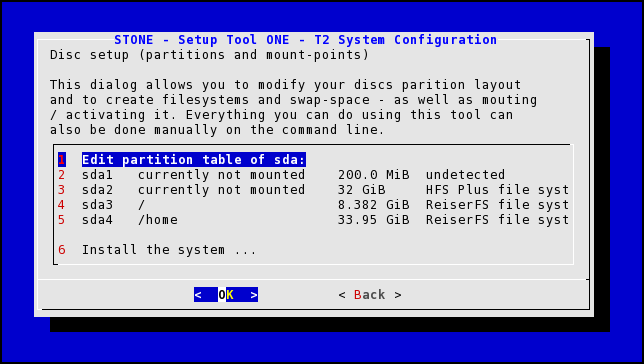
5. After selecting the keyboard layout the installer allows partitioning
the hard disks by using the normal tools such as parted and the fdisk variants:
6. After selecting 'Install the system ...' the next dialog allows customizing the installation source, mostly for network installation. The detected content should usually be fine and 'Start the gasgui Package Manager' can be selected immediately:
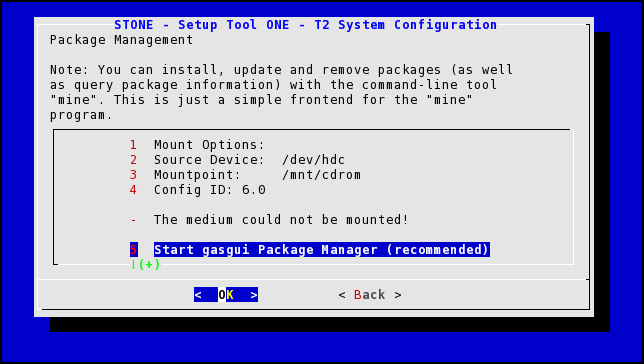
The installer allows selecting a minimal or full installation and browsing the package tree and it's dependencies. The status of the installation is shown and additional media requested as needed.
7. Finally the setup tool Stone is run and immediately asks the most important settings such as root password, timezone, ... and runs the platform dependent boot loader configuration modules.