
#3 From scratch to login promt with T2
I am a Linux user for about 15 years or so and i was always wondering about what is "under the hood" of it and how it's put together. I was especially interested in how a distribution is made up, since there are so many things that you have to take into account. Recently i was asked about one of my customers to deliver an embedded device capable of maintaining a small database, serve some pages via http and print some information on a thermal printer. In an instant i said embedded Linux and the customer agreed. Driven by my customer demands and of course by my unsatisfied curiosity, i started searching the net for such distributions. And they are many. From DSL that fits in a credit card size CD to Puppy Linux, you can take your pick.
But in my heart i wanted to build my own Linux. Out there there are many howto's and distribution projects like LFS (Linux from scratch) and OpenEmbedded. All of them offer a way of building your ow Linux either for an totally embedded target like an ARM based SBC's or for a normal x86 target or PowerPC. But in one way or another almost all failed to build from start. Maybe it was my fault because i have to say that i am considering myself a newbie in Linux internals. I mean i know how to configure it's services, i know how to develop software on it but i built a kernel only once or twice in my entire time of Linux usage and i do not know in depth how it works inside. I decided that my gap in the Linux internals has to be filled somehow and the sum of this knowledge i gathered along the way of building my own Linux i will share with you.
I mentioned earlier that there are some projects on the net, projects that can be used to build your own distribution. Well i found out on my own that it's not so easy to even start building. You have to have some sort of development environment, you need a lot of dependencies and of course a lot of documentation. The problem i saw at many of the projects i tried is the lack of documentation. Plainly said; the authors of the projects assume that you are a Linux guru and you know by heart all the kernel internals. There are of course some guides but if there is something that fails along the way... you are on your own.
After days and days of search, download, try and fail, something caught my attention. I was searching the net for mini Linux distributions and i found Puppy Linux. It's a small Linux distribution that you can remaster yourself and enhance or strip down as you see fit. I couldn't resist. I downloaded it and installed it. I played with all the installer options and surprisingly all of them worked out of the box. If you visit the site of Puppy Linux you will see what i mean. Because i liked what i saw in Puppy i said to myself that i would like to have something similar to myself... And then it hit me. There is a Puppy website from where you can learn how to remaster your Puppy... And there i found out about T2 SDE project.
Basically and in a few words, with T2 you can build your own Linux an a few days (and i am very serious about it). I did this myself and the following describes how i did it. Do not be afraid. The T2 is really easy to install and use and for all your questions there are ways of finding the answers from it's maintainers or from me. So let's cut the crap short and get going...
The build environment
The build environment is the sum of tools, scripts, manuals and a working distribution, that gives you a complete system SDK. T2 is such a system. You can download the t2-7.0-rc2-minimal-i486.iso from the download page. This is the base system we will work with.
The Target
It is the device on which the distribution will run. In my case the target is an embedded VIA EDEN C7 500 MHz with 1GB Ram and 2 GB CF card.
Yourself
One highly motivated Linux user with hidden desires of knowing more about Linux, a lot of spare time available and many cups of coffee available.
The development PC
One PC preferably SMP with minimum 2 GB of ram and plenty of disk space. Myself i have one spare Intel Dual core at 3 GHz, 2GB Ram and 2 IDE HDD of 120 GB, dedicated especially to this job. Of course T2 can coexist with other OS's, because it's boot is controlled by GRUB.
Step by step guide:
1. Download the T2-7.0-rc2-minimal.iso from T2 project download page. This is the base of your system. In the meantime please READ THE MANUAL!!! and the two sections regarding the T2 installation and building. Honestly they really work as they are saying if you respect their steps (and my tweaks of course).
2. Burn the ISO on a CD and install it on the development PC as you like, following the instructions. Actually there is a chapter saying that you can use a non T2 base system and still be able to build a working distribution but that part is not covered here. I will cover it in another article a little later. For now we will stick to T2 Recommended environment.
3. Download the actual T2 SDK from the source tarballs. Again I download the same version as the ISO installed before, so the choice was be "t2-7.0-rc2.tar.bz2" from http://dl.t2sde.org/source/. Put this file as it is into a directory of your choice. I personally made a embdevel directory in /home.
4. Extract the archive there and now you are set.
5. From here you can follow the instructions in quick build from the T2 site because they are correct.
Known issues with the current T2-7.0-rc2-minimal:
1. Perl package is incomplete and will give you errors at build. Actually you cannot build almost anything without perl package in full condition so before starting to build something please install perl like this:
On dev machine:
a. Go into the directory where you unpacked t2
b. enter into the t2-7-0-rc2 directory
c. run the scripts/Emerge-pkg script
This will ensure your build environment has a functional perl and you can start building a distribution.
2. I advise you as others do to build first a minimal in order to fix and check if everything is OK. After that you can tweak the packages you need as you like. Be aware that there are differences between the mirror sites regarding the packages that are needed. Many of the packages are new and the download will fail even from original URL. My advice is to investigate the web for the package that fails to download and modify the corresponding package definition file in /packages directory of your T2 installation.
3. Dependencies are automatically resolved only for installation of additional packages on your current T2 installation. They are not resolved for the build of a new distribution. So if you want to have php in your new distribution you are going to build, you will need a bunch of additional packages like mysql, postgresql, etc to be selected. Look into the package directory fir the package you want to install. Inside each package there is a file describing the dependencies. I know the process sometimes can be daunting if you add many packages but the result is amazing. You will have your own distribution to play with.
Creating T2 installation media
T2 is smart enough to include installation scripts for the distributions you build. You just have to select in T2 configuration at the install section "install/CD disks" and T2 will prepare everything for a successful installation set. For now we will follow a quick path that works out of the box, but by reading the T2 handbook you will find aditional installation options you might consider using.
Create an ISO image:

We can create an ISO image of the distribution we just built, by issuing "scripts/Create-ISO target". Target is the target we used also with the build commands. The image will appear in the iso/ sub-directory of your T2 installation and it can be written to a DE and used to install our distribution to other PC's.
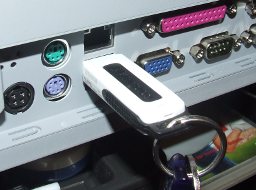
Create an installation on USB stick:
Because a CD unit cannot be readily available all the time, we can use a much cheaper and convenient way, the usb stick. First of all, create the CD image as explained above. In the misc/archive/ sub-directory of your T2 installation, there is a magic script, that will install your CD image to an empty USB stick. The stick must be large enough to accomodate the image. I have to warn you about the fact that, the tool, will erase all your data from the stick and create all the necessary partitions for the disk installation. With these said, you cd to iso/ subdirectory and issue "../misc/archive/iso2stick -fs ext2 isoimage stickdevice". The isoimage is the image you created with Create-ISO script and stickdevice is the device reported by the system when you inserted the stick into the USB port. Beware that stickdevice has to point to the entire disk assigned by the system, not to a partition from the disk (eg. if your usb stick device assigned by the system is /dev/sdc and you have a partition on it /dev/sdc1, you must use for stickdevice the /dev/sdc). The script will use fdisk to create necessary partitions, it will copy all the distribution files, it will install the GRUB bootloader and finally it will issue the sync command to ensure that all the data was written to the stick. You can then put the stick on your target machine and boot from it. The installation of T2 will run in the same way as the one from CD.
Installing on Compact Flash:
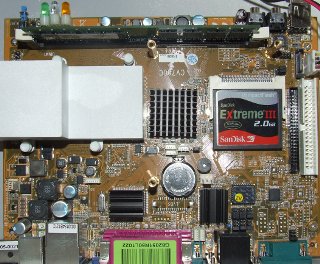
Create the installation media by using one of the methods described above. On your target machine boot from CD or from USB and install the T2 system in the same way you would do it on a normal PC. The CF card must be large enough to hold the entire unpacked distribution. As you see in my setup i use 2GB CF cards just to be sure. I personally use high speed CF cards because my setup requires for the system to be up and running in less than 30 seconds.
The method i described above applies to all X86 machines with at least one USB port or IDE port on board. Also the board's BIOS must be smart enough to boot from any kind of media. Also a minimal T2 does not have the cd writing tools installed by default, so if you want to use this approach you must install them via the already known Emerge-Pkg script.
Final words:
I was thrilled by the fact that i could build my Linux personalized as i wanted to and i embarked into this project and made it work for me. I know it's not an easy task but pleas try and do not give up on the first error that appears. All the answers to the errors you encounter are already on the net either on the T2 mailing lists, or on the news servers or IRC. I use T2 for my production systems for some time. There are already 150 Linux embedded x86 machines up and running without a glitch.
Finally i want to give a big thank you to all the guys behind the T2 project. They helped me a lot and they put up a brilliant project. Keep up the good work guys.
External links
The Author
Iulian Demetrescu is a Software developer and owner of P&C Information Systems SRL, a company specialized in providing turn key solutions for the financial and banking sector. He's using Linux and other *nix OS's for about 15 years and develops applications for these platforms. Additionally he is a system integrator and hardware designer and many Linux based solutions that require custom built hardware.